1. Mic positioning
Optimum mic placement will depend on the sound of the instrument and the sound
of the space it's in. As a general rule of thumb, start by listening to how
and where the instrument makes its sound, and what the room contributes to that
sound. Position your mic to achieve the right balance between the two.
2. Drum miking
Recording drums could easily involve ten or more mics, but this won't necessarily
make them sound better – it just gives you more balancing flexibility
later. A four-mic solution can be just as effective: put one in front of the
kick drum, one on the snare and a stereo pair over the top. For those that have
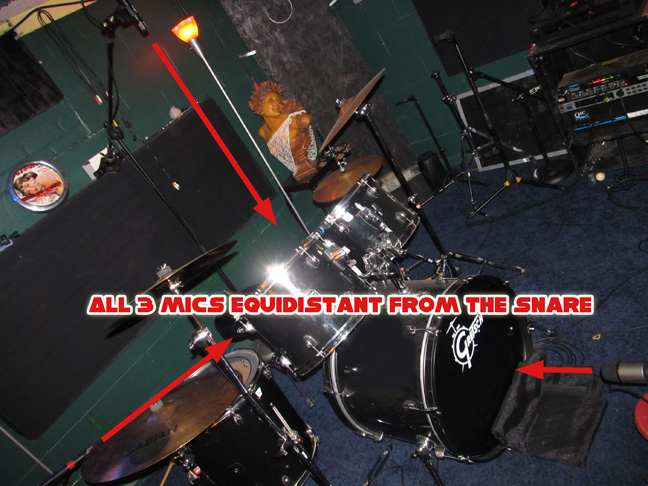
read this far, I'll do a favor and show my personal faorite miking technique:
the 3 mic "Glyn Johns Technique". It involves placing two overheads:
One directly over the snare about 4-5 feet up, the second just above the floor
tom pointed at the snare. The kick drum mic is in front of, you guessed it,
the kick. Now here's the important part: all three mics need to be equidistant
from the snare. Get a tape measure or a cable and measure them.This should give
you a phase-coherent image of the kit as a whole. (see picture below)
3. Beats first
You've got to start somewhere, and most tracks are built on rhythmic foundations.
So if you're recording a track bit by bit, get some proper beats down first.
This gives the musicians something real to play to (rather than just a click)
and will help shape the feel of the track.
4. Dry vs wet
For most instruments, you'll be looking to add and adjust effects levels (reverb,
delay and so on) when you mix, so recording these with your original sound can
be a mistake. However, there are exceptions – for example, electric guitar
parts, where the effects are an integral part of the sound and performance.
5. Mic and DI
For guitars and bass, try recording separate DI and mic signals. This gives
you a clean DI sound and a character-rich amp sound, and balancing them on playback
gives you the best of both worlds. If you later decide the original amp sound
isn't right, simply put an amp sim plug-in to work on your DI signal.
"Recording drums could easily involve ten or more mics, but this won't
necessarily make them sound better."
6. Headphone mixes
Serving up a perfectly mixed headphone feed may make the performer feel good,
but it can be deceptive. Keep it simple: concentrate on providing a solid pitch
reference, a solid timing reference and foldback of what's being played (with
added effects if required). This should give the musician all they need to deliver
a good performance.
7. Record at 24-bit
A higher bit depth enables you to have a greater dynamic range and to capture
more subtle detail in your recordings. On the downside, a 24-bit file is 1.5
times the size of a 16-bit file. Even so, the benefit outweighs the cost, because
the extra dynamic range means you can allow yourself more headroom when you're
recording.
8. Sample rates
With new interfaces delivering 96kHz and even 192kHz audio, the pressure is
on to record at higher sample rates. However, the norm remains 44.1kHz or 48kHz.
Part of the reason for this is file sizes, with 24-bit/96kHz recordings requiring
over three times the space of CD-quality audio. This being the case, it may
be prohibitive for massive multitracked sessions, but it's worth trying higher
sample rates for simpler sessions. Just keep an eye on your hard drive space.
9. Headphone bleed
Always bear in mind that your mic could be recording unwanted extras. Combat
this by picking a pair of headphones that are fully enclosed. Then set your
headphone level to avoid loud volume when you're recording quiet tracks.
10. Low latency monitoring
Many audio interfaces now offer basic hardware monitoring. Even a simple analogue
desk can provide you with the same options and more besides, including auxiliary
sends for effects and a dedicated headphone send. The whole idea may seem like
a bit of a step backwards, but if you do a lot of recording, it can prove productive.
11. Gain structure
Getting a clean signal into your computer requires a basic understanding of
the way signal levels work. Mic preamps always have an initial gain control,
but they may have other level controls later in the chain. For best signal performance,
set these to zero or unity, and use the initial amp gain to adjust the level
to your needs.
12. Dropping in
On a tape machine, dropping in to record overdubs is a pretty straightforward
process. This isn't the case with all audio sequencers, but on the upside, you'll
likely have more tracks to play with. Simply set up a 'monitor' track and drag
takes onto it for playback while you continue to record to new tracks.
13. Compression
With 24-bit recordings you shouldn't run out of dynamic range, so the technical
need to compress when recording is less than in days of old. However, you may
want to do so purely for convenience. Avoiding fast release times should make
any unexpectedly heavy compression less obvious.
14. EQ while recording
If you're confident in your monitoring, EQing when recording is a good plan.
Even so, if you find you're boosting certain frequencies by more than 6dB, beware.
One cautious rule of thumb is to split the difference between zero and your
preferred amount of boost.
15. Computer studio
If you record in the same room as your computer, noise can be an issue. Position
a directional mic so that its rejection node points at the noise source. Alternatively,
if possible, manually reduce the computer's fan speed. Just don't try to hide,
cover or screen off your PC, as it will just get hotter and noisier.
16. Separate rooms
A simple 'flying' lead can connect you (and some mics) with other rooms in your
house. Bedrooms often make good dead spaces, thanks to the abundance of soft
furnishings they contain (and they also tend to be in quieter parts of the house).
Using a separate recording space enables you to listen objectively while recording.
17. Polar pattern advantage
Directional mics can be surprisingly good at keeping out unwanted room noise.
In a small space, try a cardioid with good rejection and a tight pickup pattern.
Alternatively, try capturing a singer/guitarist using a figure-8.
18. Return to the source
A posh microphone won't make a poor instrument or bad performance sound any
better. Look for weaknesses in your playing and instruments and address them
first, then you can reward your efforts by splashing out on a new mic.
19. Software setup
Amid the flurry of preparing for a recording session, you might forget to get
your software straight. If you're planning to record regularly, it's a good
idea to set up a song template or two for different situations, with inputs
and outputs all suitably routed.
"If you record in the same room as your computer, noise can be an issue.
Position a directional mic so that its rejection node points at the noise source."
20. Lock multiple tracks
These days, most decent audio software enables you to group tracks together
easily. This is now an essential process when recording and editing multitrack
sessions, because with concurrent tracks locked together and fully in sync,
you can edit them quickly and simply as one unit.
21. Use your ears
Before recording in an unfamiliar space, take a walk around, talking, shouting
and clapping your hands in different places. This will give you a good impression
of how various parts of the room respond to different volumes and sounds, so
you can set up appropriately or make changes if necessary.
22. Use the room
Achieving a good room/direct sound balance using a single microphone can be
difficult. If you do want to capture some natural ambience, set up a separate
microphone for the purpose. The ideal position will depend on the room's size
and character – there's no substitute for a little experimentation.
23. Tuning
Multitracking and overdubbing will lay bare any tuning issues you have. Stay
on top of tuning at the recording stage and you'll find finishing the track
much simpler. Check your instrument tuning between each and every take. If in
doubt, listen back with the musician or singer, pinpointing the problem areas
– then fix them.
24. Mic choice
Ruggedness, sensitivity and sound are all major considerations when it comes
to choosing a mic. For handheld use, a typical condenser will be too vulnerable
to contact noise, so use a dynamic. For quiet sources, on the other hand, you'll
need something quite sensitive, so use a condenser mounted on an appropriate
stand.
25. Remain objective
It's all too easy for your ears to become accustomed to poor playing or bad
tuning while you're concentrating on the technical side of the recording process.
To counter this, try to retain an overall sense of perspective (also known as
'punter's ears') and address problems at the source rather than planning to
fix them later.
Legal-Type Stuff
Q: We’re about to go into the studio to record, and I want to make
sure we’re being smart and protecting ourselves here. What advice
do you have for us before we record our new CD?
A: My biggest piece of general advice to all of you is to do something
you are already doing: educating yourself. Protecting yourself and your
musical creations before anyone pushes the “record” button is one
of the most important things you can do for your music careers.
From a legal standpoint, there are six steps that I always share with clients
– a checklist of sorts before they go into the recording studio –
that I hope will be as helpful to you as being able to speak Klingon at the
Comic-Con convention.
Step One: File your Form PA (for published or unpublished
works of the performing arts) with the Copyright Office.
I’m often asked whether this step is even necessary, and if so, why?
Here’s the deal: it’s true that copyright exists the moment something
is created and fixed in a tangible form of expression. However, registering
your work entitles you to certain important rights. It’s easy to
do, and with the additional tip I’ll share here, it’s very inexpensive:
if you know all of the songs you’re going to record in advance (which
tends to be the more cost-effective approach to recording in my experience),
you can submit a single Form PA for the entire collection of songs, and it will
only cost you one filing fee (currently $65.00 for electronic filings).
So, what important rights do you get for registering your work? First,
you have to register your works with the Copyright Office in order to gain access
to the Federal courts to enforce a claim for copyright infringement. Second,
if you register your works in advance, you may be eligible for “statutory
damages” (you know the F.B.I. warnings that threaten big monetary damages
before every movie?), as well as the recovery of attorneys’ fees. Third,
if registration occurs within five years of publication of the work, your burden
of proof at trial is made easier by the Courts.
At this point, you may think that none of that really matters. However,
if someone used your material down the line and made a lot of money off of it
without your permission or the proper licenses in place, you would probably
feel as hopeless as a one-armed man in an applause contest. Think of it
this way: registering your works is kind of like buying car insurance.
You never need it until you do, and then, the more the better. You are
also much more likely to find an attorney willing to take a case on contingency,
or even pro bono, if they can seek to recover their attorneys’ fees from
someone else at the end of the day.
Step Two: Talk to your songwriting partner(s) and/or
bandmates and work out whatever you guys need to work out so everyone is on
the same page going into the studio.
Does everyone get equal copyright ownership and control over the songs and the
sound recording? Did one person write all of the songs, and if so, do
any of the other band members expect any copyright ownership over the material?
Are you going to treat copyright ownership of the sound recording differently
from ownership of the songs themselves? Is one person going to be in charge
of licensing decisions and be allowed to sign for the band, or does everyone
get a say? Did your drummer really just implode and vanish into thin air?
I have a laundry list of questions that I ask my clients to discuss with their
songwriting partners or bandmates before they head into the studio, so everyone
is on the same page. These are questions that people hardly ever talk
about before the money starts rolling in. However, they are all important
things that every artist or band should consider when working as a collective
(including the drummer’s history of imploding on stage). A written
songwriting agreement or band partnership agreement can salvage friendships,
and act as a roadmap for everyone. If you don’t have a roadmap,
how do you know where you’re going?
Step Three: Figure out who is going to be involved in
the recording process. If you don’t want to risk them possibly owning
a part of the copyright in your song or sound recording, you should have a work
for hire agreement in place with them.
Are you hiring a sound engineer or producer to work on the album? Is your
sound engineer suddenly calling himself a producer, when you thought you were
producing the album? Did you hire a string quartet, or other instruments
not normally in your group, just to enhance the recording? Who is mastering
the project?
Each of these people contributes some creative element, however large or small,
to your music in the recording studio; and depending on the nature of that contribution,
they could argue down the line that they are a joint owner of the work.
Although the general rule is that a person who creates a work is the author
of that work, U.S. copyright law creates an exception for “works made
for hire,” in which the employer or person commissioning certain works
for use is considered the author of that work.
Sometimes things get a little sticky in the studio; egos take over. An
instrumentalist creates a riff that becomes an integral part of the song; a
sound engineer starts taking on more of a producer role; maybe your cowbell
player thinks his stellar bell placement entitles him to 50% of the royalties.
A work for hire agreement makes ownership of the copyright clear from
the outset. If someone isn’t okay with it, at least you’ll
know that up front, and you can make an empowered decision whether to use that
person, or whether to go with another person who is willing to sign a work for
hire agreement.
Keep in mind that consideration is required for a contract to be valid.
This is a legal concept meaning something of value that is given in exchange
for a performance or promise to perform. In some states, credit may suffice
as adequate compensation. In other states, there may be a minimum amount
of monetary compensation required.
Step Four: When the final recording is complete, it’s
time to file a separate Form SR to protect your interests in the sound recording
itself.
As I have said before, there is a separate copyright for the song and the recording
of that song. Even though you filed your Form PA before recording, you
will also want to file a separate Form SR to protect the sound recording of
that song. This will become particularly important when a producer or
music supervisor suddenly becomes interested in obtaining a master use and synchronization
license from you for their new hit TV show.
Step Five: If you plan on filming any behind-the-scenes
footage or videos, get permission first.
The recording process is a fun, creative environment, and with the advent of
new technology, fans like to be a part of it. As artists, most of us can’t
live 15 minutes without uploading photos and video footage to our social media
channels to justify our existence by posting to the web; after all, we all know
if you don’t post it to the web, it never really happened (kind of like
the sound of that one-armed man clapping in the forest).
It’s great to utilize technology as a way to keep fans in the loop.
However, in most states, did you know that you can be sued for using someone
else’s name, voice, image, or likeness without their permission for an
exploitative purpose?
If you are going to be filming any music videos or behind-the-scenes footage,
or shooting photographs featuring people outside of your band, make sure to
get permission first. Get a talent release from them before you start
filming if possible. Otherwise, you may spend a ton of money in post blurring
out faces, only to have your awesome new music video look like an episode of
COPS.
Step Six: Get the proper licenses if you are recording
any cover songs.
If you’re recording any cover songs, at a minimum, you’ll need a
mechanical license. Be sure to read my previous DIY Musician blog, “Posting
Cover Songs on YouTube: Music Licensing Explained” to get a better understanding
of the licenses you’re going to need to record the cover song on a sound
recording for commercial use, to print lyrics for the song, or to do a music
video.
So, here’s a quick recap of the six steps I recommend you look at closely
before going into the studio:
1. File your Form PA for the collection of songs that will be on your
upcoming album;
2. Talk to your songwriting partners and/or bandmates to figure out what
everyone’s expectations are with regard to copyright splits and ownership/control
ahead of time. If possible, get a songwriting or band partnership agreement
put together so it’s all clear and in writing;
3. Get your work for hire agreements in place for anyone who will be working
on the album but who you don’t want to possibly end up owning a piece
of your music (More cowbell please!);
4. File your Form SR when the recording is completed;
5. Get permission / talent releases in order if you are going to use someone
else’s name, voice, image or likeness for an exploitative purpose; and
6. If you record any cover songs, get a mechanical license for the sound recording,
and realize that you may need other licenses as well, for example, if you plan
to print lyrics on the liner notes, shoot a music video, etc.
Now it’s time to put those 3D glasses on and read the fine print.
MusicBrainz
AllMusic